Tuesday, December 27, 2016

Nearly a New Year!

Hello!
I have been away far too long. I have decided that I must make this blog more of a priority next year. I thank you for sticking with me. I have found that it is easier to just post my pictures on Facebook, so that is what I have been doing. But, I know that my post on Facebook can get lost in the "crowd" and it is far easier for people to find it in their in box rather than surf Facebook!

I wanted to show you a card that had been in my head ever since I saw the new mini catalog, which we call Occasions, last month. If you need a copy of the new catalog, which starts January 4th and lasts until May 31, 2017, please let me know! The card features the Up & Away Thinlits, specifically the large balloon and three of the different cloud dies. I cut the clouds from Dazzling Diamonds Glimmer paper. The DSP, or Designer Series Paper, is one of the items that you can get for free with a $50.00 order, during Sale A Bration! (which also starts January 4th, and lasts until March 31, 2017) The whole package is perfect for the balloon dies as well as the stamp set, called Lift Me Up. You get 12 sheets of 12 x 12 paper in the free package, 2 each of 6 double sided designs. The dies and stamps can be purchased bundled together which saves you 10%!


 This is the front of the card. The verse is from the stamp set (Lift Me Up) and it is stamped on Whisper White and die cut using the Project Life dies. The clouds are popped up on dimensionals.

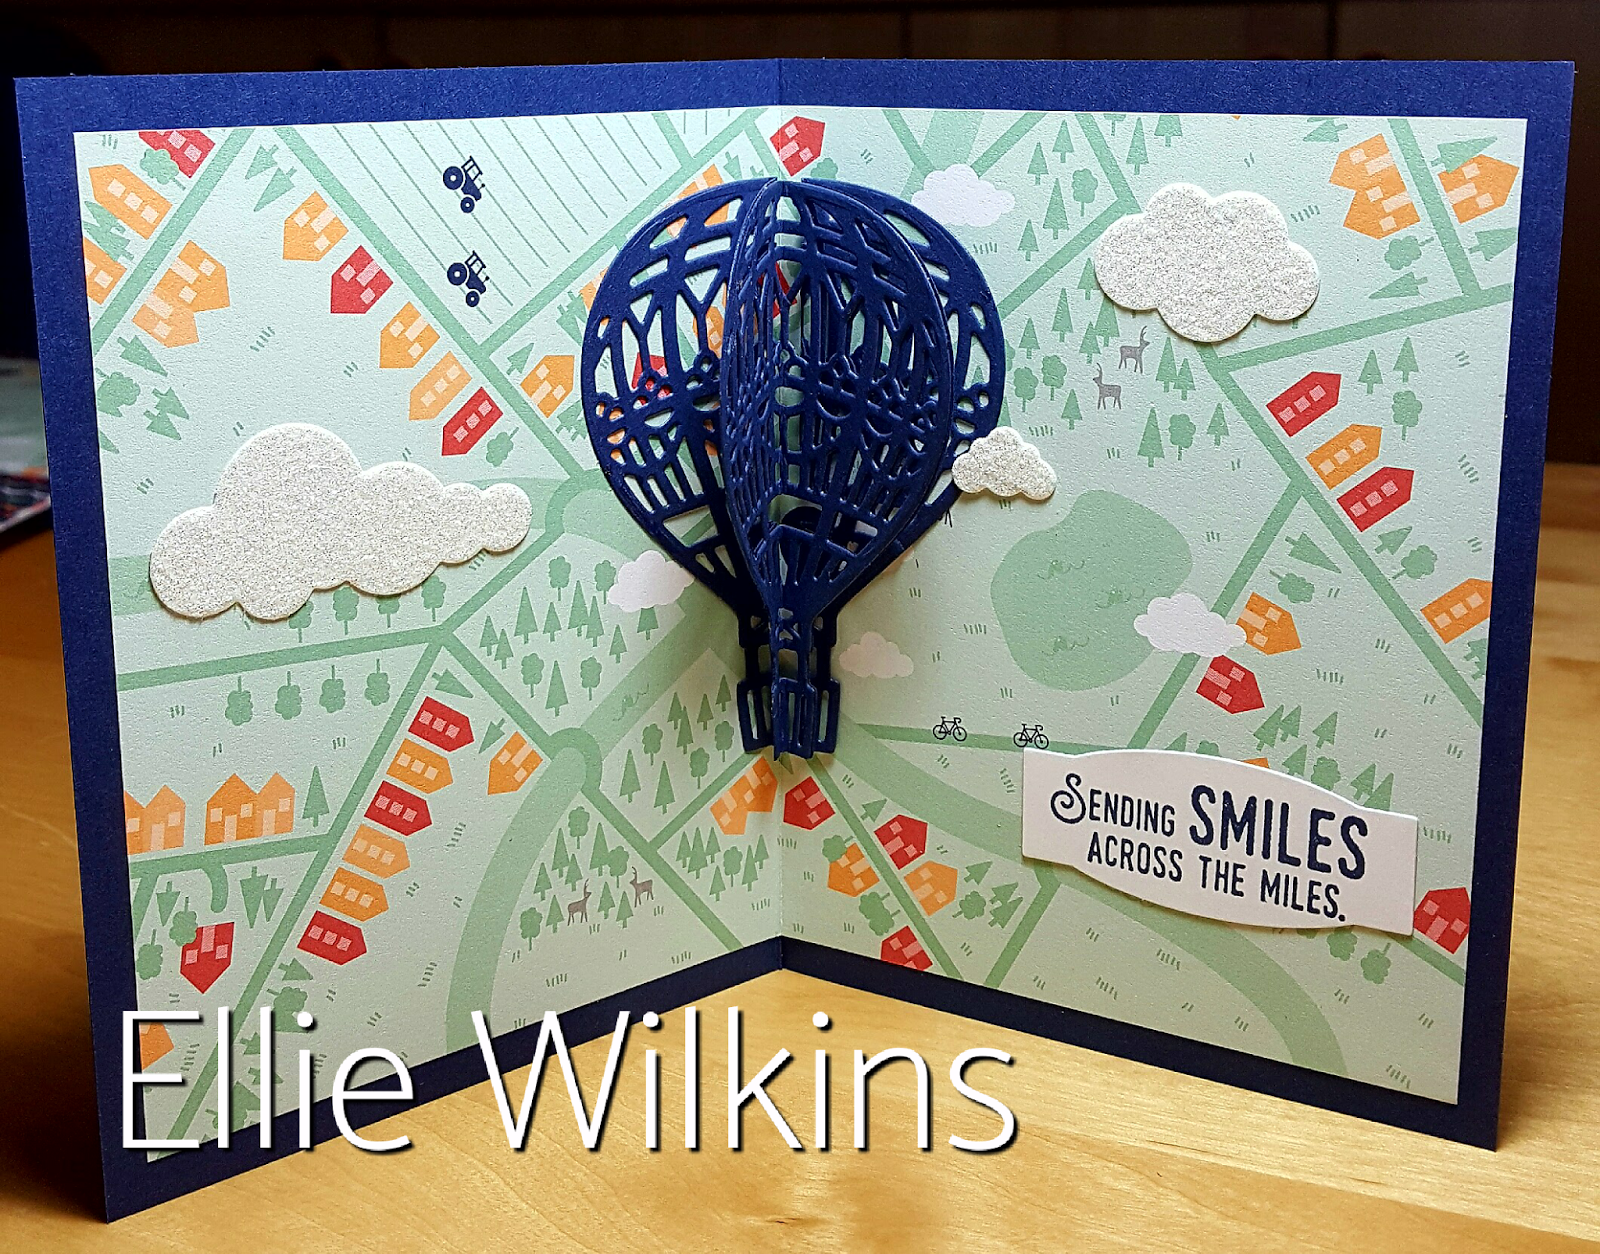
Here is the inside of the card. The balloon is a 3-D piece that uses 3 die cuts. I  scored the balloons first and made sure that they would fold correctly.  I carefully glued together two pieces and held them in place with paper clips until I felt that the glue had set. Then I glued the third balloon die cut in place and kept them clipped together for about 20 minutes.  There are three glimmer clouds on the inside. 


Here is a better look at the balloon. You can see how it folds flat so that the card can be mailed in a regular envelope. When the card is opened, the balloon pops up! I love how the two sentiments work so well together. I definitely think this would brighten someone's day, don't you?

Thanks for stopping by today. I wish you Peace and good health in the New Year!


Thursday, December 1, 2016

December Blog Hop


Hello dear friends!
Have you just been to see what my friend Barb has done? What did you think? I'm sure it is wonderful! This blog hop might not happen without Barb making it so! Thanks Barb!

It has been so long since I have written anything...tsk, tsk! I really want to try to do better at posting more often. I shall try to make that happen! 

In my last post I mentioned that I had shingles. I was lucky in a way because it stayed on my scalp and face. The itching was intense and I am very glad that I am over it. 

In October I went to a retreat in Texas with my "boss", Diana. We had the best time! It was a stamping retreat and we learned many very artistic techniques. We also managed to sneak away to Magnolia Farms one afternoon. Have you ever watched the show Fixer Upper? This is their retail shop and bakery. What a blast. I did buy a sign for my craft room that says "inspire" that is made from metal. I have it hanging above the door, and now I can't imagine it not being there. It is perfect! I wasn't sure what I was going to do with it when I bought it, I just knew I needed it!!

And now here we are on the heels of December! How did that happen?? On November 29th I had a class here in our home that is best described as a party with paper crafting mixed in! I had the gals bring pot luck, and boy there were some yummy dishes. Thank you all!! Ed made a breakfast Strata the night before, and baked it after the people started arriving. While I was getting all the stuff together for our lunch, the gals started making gift tags. I had 20 stations set up about the house, and they would make one tag and move on to the next. There was laughing, stories and creativity flowing all through the house. Some of the tags used retired Stampin Up stamps but most were current products. Many were fairly simple to make. I am only showing the current product ones for this blog hop. Sorry about the lighting, I caught the last bit of the sun before it was done for the day. The first one is probably my personal favorite. 
 A bit of work gluing all the bits in place, but I think everyone loved this one! 
 You know you want to!! Right?!
 Sparkles with rhinestones, but the burlap adds a country touch!
 Do you see the little metal bell charm?? 
 Fun little epoxy star highlighting the banner!
 Simple! But I like the contrast of the red sweater look behind the vibrant green.
 Another simple one, but the holly paper is oh so festive!
 Santa's fur was painted with liquid pearls. He looks dapper, don't you think??
 Simple, but the addition of the punched dots for the holly berries really makes this one work beautifully.
 This one would be so darling atop a plate of your best Christmas cookies!
 This pine cone one was a favorite of many. They all loved the little jingle bell charm!

The tree shimmers with silver sparkle paper behind the cut out. 
 Silver and red...stunning!!
Simple, but sweet with the new Stitched Thinlets!
Thanks for joining me on this blog hop!! 
Now go create!
But, first head over to Mary's blog to see what fun stuff she has done!!
Merry Christmas!
 http://www.doggandponyshow.blogspot.com

Friday, September 30, 2016

September Blog Hop!


Hello dear friends~
I am writing to you on Friday evening, but I will delay the post until midnight tonight. 
Today I spent most of the day waiting around to see doctors or talk to doctors or waiting for prescriptions...it turns out that I brought home shingles as a souvenir from Alaska!! I believe that I am entitled to a partial refund! Ha!! I do have the prescriptions and I am hopeful that it will be over quickly!!

I did spend part of the morning making my card for the Halloween Hop! I must tell you this baby came together SO FAST!! There is nothing to it, really!! The dies do most of the heavy lifting and the only stamping is the verse and the pumpkins! That's IT! Crazy easy!! You, yes you, could make this! 
Here are the details:
Paper: 
Basic Black card stock
Pumpkin Pie card stock
Crushed Curry card stock
A Little Foxy DSP
Ink:
Basic Black
Stamp Sets and Dies:
Spooky Fun Stamp Set
Halloween Scenes Edgelits Dies

I really like this card! The little banner is popped up on dimensionals. 
If you would like to order any of the supplies or anything else from Stampin Up, please let me know! Or you could go to http://elstamper.stampinup.net and place an order on line. It is easy, but if you need help, please let me know. 
Now you can hop to Diana's blog...just click on the button below! I can hardly wait to see what she has done. Please stop by all the folks on the blog...and give them some love.  
Until next time, take good care!
                            ellie :)


Di         http://www.stampingwithdi.com

Ellie     http://www.elstamper.blogspot.com you are here!

Wednesday, August 31, 2016

September Blog Hop!

Hello dear friends~
You may have just hopped here from Mary's blog. Welcome!! Thanks for stopping by!


 The theme for our hop this month is to use items from the new Holiday mini catalog... anything!! Hoo boy howdy, this catalog is so jam packed, that covers a lot of ground. 

At first I thought about a fall card... but I really wanted to play with Christmas. I figured that the other gals might use the Cookie Cutter Christmas stamps and punch so I decided to use the Christmas Pines Stamp Set along with the Pretty Pines die set and the coordinating Pine Bough embossing folder. 

We used to live in the White Mountains of Arizona and believe it or not, that area (the Mogollon Rim) has the largest natural stand of Ponderosa Pine trees in the country! I loved living up there, except during fire season!

My card is the result of my first chance to play with all these goodies! It kind of designed itself! 

 A close up of the pine cone! With a bit of the greenery that you can do with the die set!

 A close up of the detail from the embossing folder- what a crisp impression!

The full front of the card. I just love how it turned out. I had thought about adding some rhinestones or pearls, but I decided to leave well enough alone. The plaid background paper that the card is resting on is from the adorable 6 x 6 paper stack called Warmth and Cheer. Very festive. 
I would LOVE to hear from you ~ tell me what you think of my card!! Thanks for stopping!

Until next time, take good care!
Ellie

Please continue on to Melissa's blog- I can hardly wait to see what she has done!!
 http://www.stampinupwithmelissa.blogspot.com

Supplies used include:
Card Stock:
Whisper White 
Garden Green 
Real Red 
Mint Macaroon 
Soft Suede
Early Espresso

Ink:
Real Red

Sunday, July 31, 2016

August Blog Hop!

 http://www.stampinupwithmelissa.blogspot.com

Hello Stamping friends!
It is time for our blog hop again!! Our theme this month is summer. You have just seen Mary's cute project.

While I have never been on a sailboat, it looks like fun. Except my fear of drowning, and not being able to swim, and my fear of being eaten by sharks...okay, sailing for me is a big red flag, but I have known plenty of people who have gone sailing and lived to tell about it! 

 My card uses the sailboat from Swirly Birds as well as the ribbon/waves/vine die from the coordinating die set. Each boat was hand cut. Each sail was hand cut. Luckily, with proper placement, the flags were stamped directly onto the card stock. I did "wink" the flags with Wink of Stella for a bit of sparkle!! The yellow ship and the peach/rust ship were popped up on foam dimensionals. The verse, "enjoy", is from the Endless Birthday Wishes set. There are so many great verses in that set, it isn't just for birthdays!!  

The actual colors I have used are:
Marina Mist ink and card stock along with Whisper White card stock
Soft Sky
Crumb Cake
Daffodil Delight
Crushed Curry
Wisteria Wonder
Sweet Sugarplum
Cajun Craze
Peekaboo Peach
Wild Wasabi
Garden Green
Basic Black
Sailing Regatta
 You can see the sparkle on the sun and on the flags!

Use the button below to hop to Melissa's Blog! She has an adorable project! We encourage everyone to hop all the way through, and we LOVE hearing from you!! Thanks for the love!!
Take good care!


 http://www.stampinupwithmelissa.blogspot.com/


Wednesday, July 27, 2016

July Class

Hello happy people!
I said in my last post that I would show you the cards the gals did in the class this month...only, I said maybe tomorrow...well, that didn't happen. I do try, but you know how it is...you think you have all blooming day and then WHOOSH, it is time for bed!! Ha! Here are the cards the gals did in the July class.

Fun card with an interesting folded focal piece.

The inside!


 Sweet die cut elements make this one POP! So does the paper!!

This was probably the most time consuming. Except for the verses, most of the stamping had to be inked off, which gives you two shades of the same color. This card was well loved, because they thought they would actually make this one again. 

 Looks like a normal birthday card...
But when you open it~~
WOW!


Love the sparkle! 

But when you open this tri-fold card...again, WOW!! The verse is on a piece of white card stock that isn't glued down on the top, making a perfect pocket to stow a gift card or fifty dollar bill! :) If the artist didn't want it as a gift card holder, I had other verses that they could use in place of this one.

I am working on preparing for the Fall Craft show...I am still recovering from the Spring Craft show! tsk! My card racks look like skeletons, there are so many empty pockets. But I have lots of cards to show you so I hope to be posting again soon...just not gonna say when! HA!
Take good care~
el

Friday, July 22, 2016

Thoughtful Branches Stamp Set and Dies

Hello happy Stampers!

I had a fantastic card class last week. The gals seemed to really like the cards they did. I will be posting photos soon...hopefully tomorrow. 

I am trying to remember to post my schedule here in my blog. For the class featuring the brand new Thoughtful Branches set with matching dies I will need to order the stamp sets and dies for each student prior to class. This set will only be available for the month of August! Stampin' Up has never done this before!! Exciting!!

I thought I would post some of the cards I am considering having in this very special class. If you are at all interested in this class, please call me immediately. This class will be very limited, because once they run out of the stamp sets and dies, that will be it. So please let me know as soon as possible. Also payment for this class will be due ahead of the class so I can order your bundle for you. If you are out of town, or at your summer home, let me know and I may schedule a class in January when everyone returns. I can hold the stamp set and dies for you. And now for a peek...


You will be creating these small multi colored leaves. LOVE!! The die cut leaves are made from matte finish copper card stock.

Love this dramatic black tree, and how it is hanging off of it's mat!


This one has so much going for it!! There are 4 die cut trees on this one, layered on top of each other!

Another thing they are doing for the first time ever, is with each $50.00 you purchase in July, you will get a code emailed to you that will give you $5.00 off your order in August!! 

Contact me for the class, and special supply list, then you can order what you need and get money off your next order. 
Happy Stamping my friends~ take good care!
El

Friday, July 1, 2016

Independence Day Hop!


Hello everyone and Happy Independence Day!
I am participating in a blog! What??!! These are all people on Diana's team. I hope this works! (thanks to Barb for all her hard work on this!)
If you are on the hop, you should have come from Mary's adorable project.  

My card is quite simple actually. I used Real Red card stock to make stripes from the Swirly Bird dies. Then I took a 3 1/4 inch square of Night of Navy and again used the "stripes" die to make the Navy piece look "wavy"! I think it works, what do you think??
Don't look too closely, my gluing technique is a bit off on this card. I wanted to re-make it, but I ran out of time!! Silver glimmer paper stars are the bit of sparkle this needs!!
I hope wherever you are, you have a safe and happy Fourth of July!
Now I will swing you back to the beginning, Diana's blog and her adorable project with the Jar of Love Stamp Set and Dies!!
        http://www.stampingwithdi.com

Thursday, June 23, 2016

July Class

Hello Everyone!  

I am having a class in July. Want to join the fun? I only have a few spots left. Monday and Tuesday classes are full! Three more people can join the Thursday, July 14, class at 10:00 a.m. We will make a total of 5 cards for $20.00. Full written instructions (to take home) are included as well as envelopes. Three of the cards in the class are ones I made for the Stampin' Up catalog party that I had on June 4th. At this moment I am not sure what the last two cards will be, but I am fairly certain that they will also be from the samples that day.  

This one is so easy, you will not believe it! But it looks amazing and still fits into a regular A-2 envelope! 

Love the sparkle on the Happy Birthday die cut! (I need a manicure...)

But then when you open it up there is a surprise pocket for a gift card or cash! Love all the balloons. What a party!! :)

This one also has a surprise!!

Isn't that fun!! Almost expect confetti to fall out! 
If you want to join the fun, send me an email at elstamper@cox.net. 
Until next time- take good care!