Saturday, January 7, 2017

The great craft room remodel!!

Hello everyone!
As promised, I will share pictures and tell you how this came about.

When we bought this house we knew that my craft room was going to be my craft room. In our previous home, I had my stuff in a closet in what had been my mom's room. I would carry the stuff out to the kitchen to work. Not exactly user friendly!

With my craft room in this house, it has always been just my craft room. Never combined with the office or a guest bedroom. Yes, I am very lucky. When you purchase a brand new home, there are many expenses that you don't think of, like landscaping, window treatments, 13 ceiling fans (hey, this IS the desert!!) and on and on. Expenses pile up. When we were deciding on the cabinetry for my craft room, Ed talked me out of the drawers I wanted in favor of cheaper cabinets. I have made them work for over 10 years. Now that I have so much more stuff, as well as my business, I knew I needed to fix the storing and organization of my stuff or go crazy!

Then there was the email. I subscribe to many blogs. One blog is by a lady I have long admired, Jennifer McGuire. She recently moved and was showing her new studio on her blog. My friend Pam and I oohed and aahed over it! It was the stuff of dreams!

We were riding together in the car with Pam, and we were talking about it. I showed Ed a photo of Jennifer McGuire's craft palace. Later, he said, we could possibly add drawers. We can go to IKEA and see about it. I am pretty sure we went the very next day!

Since the cabinets that were in the craft room were from IKEA, Ed believed that they would be easy to retro-fit. I believe that we bought two base drawer units that day.

The next day Ed put the drawer units together in the garage and went to install them after he was done. I had moved out of the craft room and into the kitchen breakfast nook. I heard much noise; tools whirring and a few phrases like "Son of a Bluebird" and "Mother Finches"! (language has been changed to protect the innocent!)
Turns out, two years ago IKEA switched to American made products in this country and went from metric to our standard. Everything was off by and eighth of an inch or more... whatever metric is off by. We did not know this at the time, Ed just believed that he got one cabinet that was off. So, my sweet Ed was going to re-drill the holes, but then found that the other cabinet was off as well. Back to IKEA he went. This time he got a salesperson who understood what retro-fit meant and the guy said, "oh man, how long ago did you buy the cabinets??". That was when Ed learned that they had changed! I'm glad that the products are American made. I just wish the first kid that helped us would have known what the word retro-fit meant and he could have saved us a bit of pain. This meant that we could NOT retro-fit anything, but instead had to redo everything! YIKES! What we thought was going to be a weekend project, has turned into a week long (or more) and much more expensive project. However now I have the craft room of my dreams!

And, if you have stayed with me this long, you now get to see the photos!! :) First some before photos for those of you who never saw the room before!
 Things were starting to get messy...and I realized that I didn't have any before pictures!
Here you can see one of the base cabinets going in...another snag, they didn't have the color we had before, so we were going to have to change that too. I picked white.

I had a key hole for a sewing machine, that I never used, which you can see next to the new drawers. It was my mom's sewing machine, and it is from the eighties. It is mostly made from metal, and they just don't make them like that anymore. I have kept it, but I hate sewing. Kinda silly for it to use up so much valuable real estate. I do have another sewing machine that I bought two years ago, that I have never used either....seems to be a trend. Someday, I just know I will use it on a card!!
Here is a shot of the office. Stuff from the craft room was all over the house! The wood crates were my brother's. He had them in Illinois. He stored his record albums in them. They are actually from a farm in Arizona! He passed away, in 1978, before we moved to Arizona in 1980.


Removing the doors, ready to install drawers in the retro-fit stage.
This is when he realized that he would have to drill 8 new holes per cabinet for the new doors to work! ALL of the old cabinets came out and went into the garage.
 New upper cabinets were installed first. Many trips to IKEA were made! It is about 23 miles one way.
 Here you can see the hang rail for the bases has been added.
 Base drawers installed! Product in some already! LED spot lights added to the underside of the upper cabinets. One is hanging, waiting to be installed.
Upper and lower cabinets...it is coming together!


Filled drawers waiting to be installed!

 All of the base drawers in place!
 So many drawers!

Are you ready to see the finished room??!!
 I had one DVD tower to hold my stamps. Now I have three of them with room for two more!! Behind the door are paper punches.
 See the cabinet on the bottom right?? That one has my TWO sewing machines, foot pedals and all of my sewing supplies...in ONE place!! This makes my organized heart very happy.
 I have always been a fan of Mary Engelbreit. I used to sell many of her products in my shop. I have some very precious things from those days. The welcome rug above the top cabinets is from my dear cousin. And all the knobs are ME too!
 The Mary Engelbreit print above the cabinets is signed.
 Here is my adhesive drawer!
 These acrylic blocks are used to hold unmounted stamps when we use them. The cases are filled too. I need so many because of the classes I teach. Most classes I have 8 to12 people in one class. We use multiple stamps!
 This is one drawer of Sizzix brand products. Whenever I have a precise die cut on a card, chances are that these machines have been used to create it. These are the old style dies (red, green and yellow colored pieces) I just can't get rid of them!
This is another Sizzix drawer.

This bookcase was added to hold more DVD stamp sets, but it is deeper than the DVD towers and therefore wasted space. Instead I put my cut cardstock in it, by color family. The company I work for, Stampin' Up!, has always had color families; regals, subtles, brights, neutrals, and what they call in colors, which change yearly.

I had the storage cabinet beside the new bookcase. Actually I have two of them. The other set is in the closet. They are drawer cabinets stacked one on top of the other. There are wheels on the cabinets, but the top cabinet does not have the wheels. Once filled, these do not move easily, because they are not meant to be stacked like this. These hold wood mounted stamps. They are divided by category. The boxes on top are for an upcoming class!   

The quilt, that you see just a part of, was done by my very dear friend Susan. She had it in her craft room for several years and decided to change the look of her room and asked me if I would like it! I LOVE it and am extremely proud to have it hanging in my room! It features 9 panels of cats!!
A close up! Isn't it darling??!! I really do love it. How can you not be happy looking at it?? Such vibrant colors.

Envelope and paper cabinet!
Ribbon drawer!!!! (swoon!)
I will have more photos as I get better organized. This blog is way too long already! Thanks for sticking with me!!
Take good care~

Sunday, January 1, 2017

January Blog Hop!!!


Hello everyone! Happy New Year!
You may have arrived here from my friend Kathya's blog. I can hardly wait to see what everyone has done. Please do hop to all the blogs on here...and if you can leave us a comment- we thrive on that kind of stuff!!

My card uses the Beautiful You stamp set. This is THE one set I really wanted to get just as soon as I possibly could from the Occasions catalog! I love everything about this set. The font used for the verses and the drama of the ladies, well, just perfect! My card uses the lady with the umbrella. There are 3 ladies in the set plus 8 verses, and two shadow like stamps.

I used silver embossing powder, with our fine tip glue! I didn't know that would work, but it did! I used one of my favorite techniques for the background. Taking one of the larger acrylic blocks, (block E) I filled it with ink direct from these stamp pads; Pool Party, Mint Macaron, and Island Indigo ink. One piece of advice when doing this technique is to be sure to start with your lightest ink. I put the Pool Party ink on the block first, then the Mint Macaron and finally the Island Indigo. This way your light colors don't get "muddied" from the darker inks. And the darker ink pads just absorb the lighter ink. Although you can take a paper towel and wipe off the extra ink from the pad. Just be sure to re-ink the area that you wiped!

Once the ink is on the block, all you have to do is mist the block with water...you decide how much or little you want to use. Then you "stamp" it! Easy!!

After it had dried a bit, I stamped the figure in Basic Black ink.  I added glue from our fine tip glue on top of the umbrella, as well as the rain drops coming off of the umbrella. Plus I added glue to the shadow at her feet. Then I hit the image with the silver embossing powder. Because I used watercolor paper, the black ink had not dried! So it held on to the embossing powder too. I got the heat gun hot and then focused on the embossing powder. The glue reacted to the heat and it puffed up! Fun side benefit!!

I added the sentiment, after all that excitement, in black. Adhered my panel on to an Island Indigo card base. Done!! I do like the way it turned out. And it proves that you don't always need to color the image...she looks perfect just the way she is!!
Thanks for stopping by, please use the button below to head to Mary's blog to see what she has done.

May God bless your New Year with health and happiness.

http://doggandponyshow.blogspot.com


Tuesday, December 27, 2016

Nearly a New Year!

Hello!
I have been away far too long. I have decided that I must make this blog more of a priority next year. I thank you for sticking with me. I have found that it is easier to just post my pictures on Facebook, so that is what I have been doing. But, I know that my post on Facebook can get lost in the "crowd" and it is far easier for people to find it in their in box rather than surf Facebook!

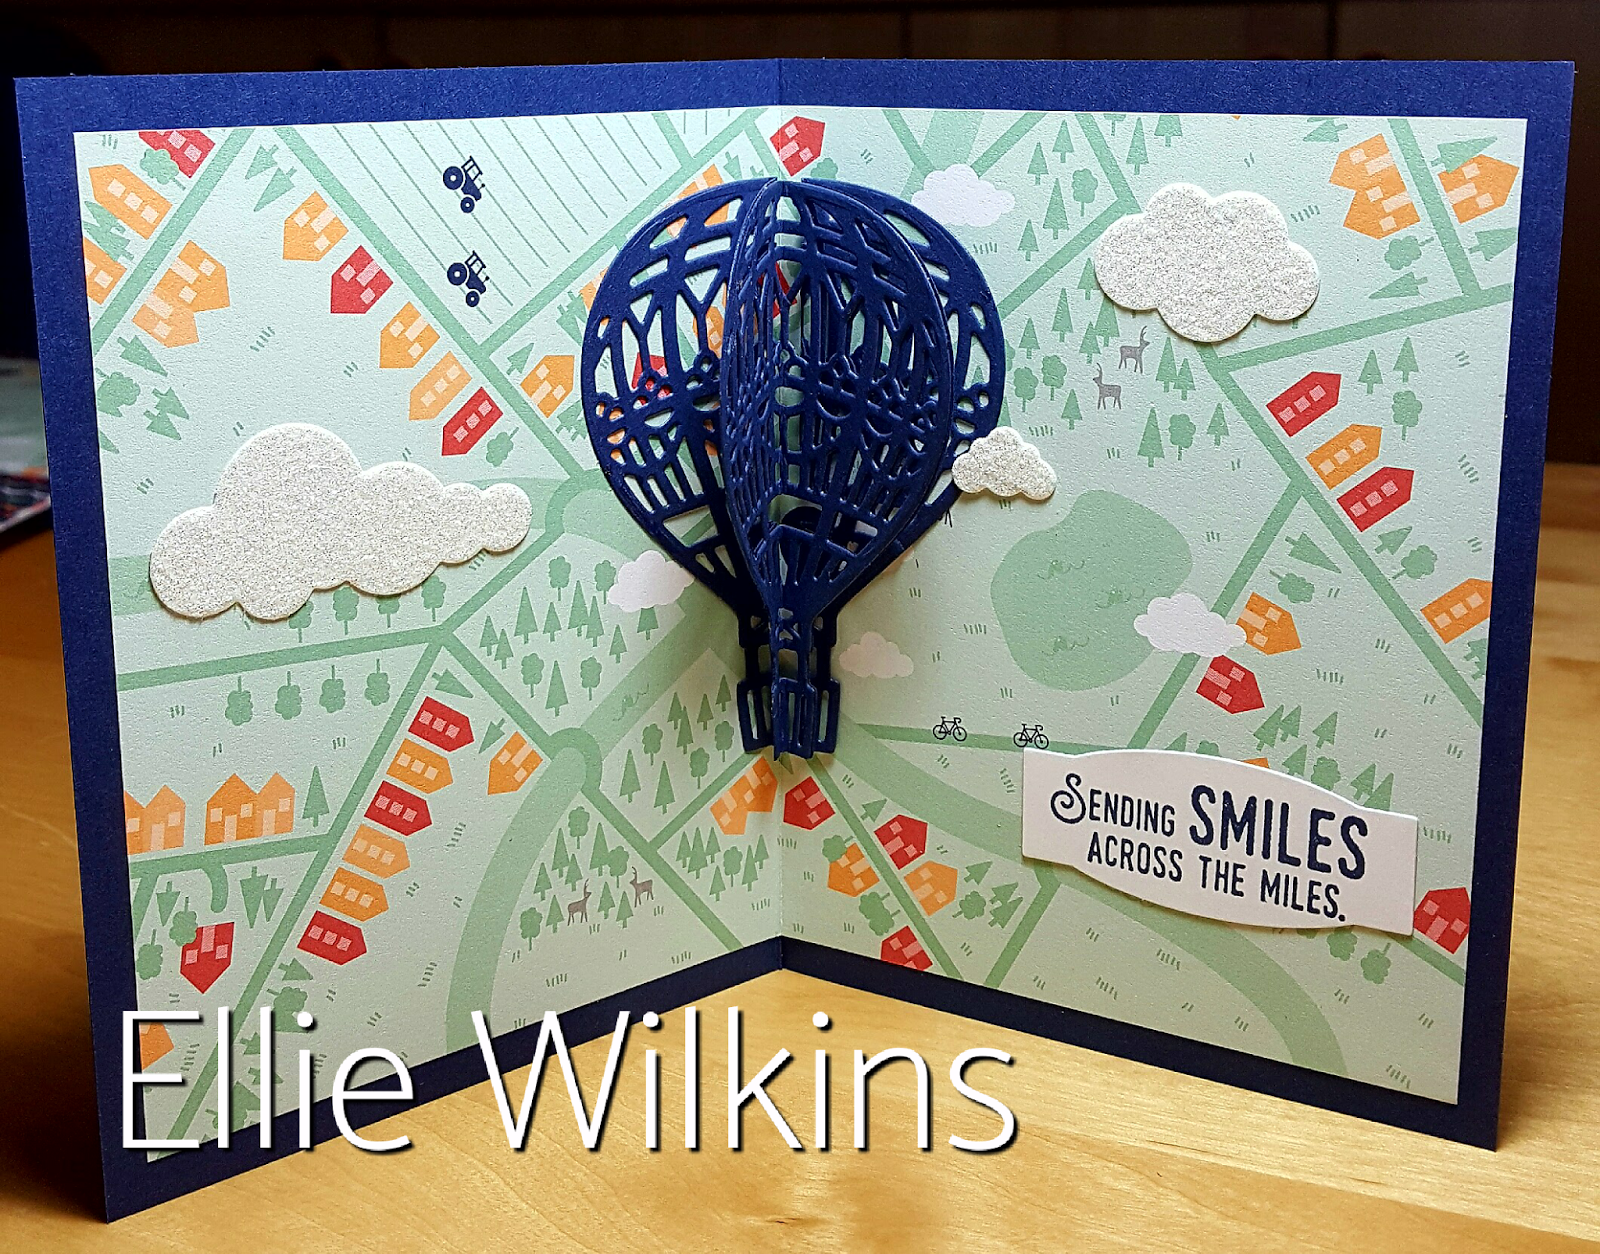
I wanted to show you a card that had been in my head ever since I saw the new mini catalog, which we call Occasions, last month. If you need a copy of the new catalog, which starts January 4th and lasts until May 31, 2017, please let me know! The card features the Up & Away Thinlits, specifically the large balloon and three of the different cloud dies. I cut the clouds from Dazzling Diamonds Glimmer paper. The DSP, or Designer Series Paper, is one of the items that you can get for free with a $50.00 order, during Sale A Bration! (which also starts January 4th, and lasts until March 31, 2017) The whole package is perfect for the balloon dies as well as the stamp set, called Lift Me Up. You get 12 sheets of 12 x 12 paper in the free package, 2 each of 6 double sided designs. The dies and stamps can be purchased bundled together which saves you 10%!


 This is the front of the card. The verse is from the stamp set (Lift Me Up) and it is stamped on Whisper White and die cut using the Project Life dies. The clouds are popped up on dimensionals.

Here is the inside of the card. The balloon is a 3-D piece that uses 3 die cuts. I  scored the balloons first and made sure that they would fold correctly.  I carefully glued together two pieces and held them in place with paper clips until I felt that the glue had set. Then I glued the third balloon die cut in place and kept them clipped together for about 20 minutes.  There are three glimmer clouds on the inside. 


Here is a better look at the balloon. You can see how it folds flat so that the card can be mailed in a regular envelope. When the card is opened, the balloon pops up! I love how the two sentiments work so well together. I definitely think this would brighten someone's day, don't you?

Thanks for stopping by today. I wish you Peace and good health in the New Year!


Thursday, December 1, 2016

December Blog Hop


Hello dear friends!
Have you just been to see what my friend Barb has done? What did you think? I'm sure it is wonderful! This blog hop might not happen without Barb making it so! Thanks Barb!

It has been so long since I have written anything...tsk, tsk! I really want to try to do better at posting more often. I shall try to make that happen! 

In my last post I mentioned that I had shingles. I was lucky in a way because it stayed on my scalp and face. The itching was intense and I am very glad that I am over it. 

In October I went to a retreat in Texas with my "boss", Diana. We had the best time! It was a stamping retreat and we learned many very artistic techniques. We also managed to sneak away to Magnolia Farms one afternoon. Have you ever watched the show Fixer Upper? This is their retail shop and bakery. What a blast. I did buy a sign for my craft room that says "inspire" that is made from metal. I have it hanging above the door, and now I can't imagine it not being there. It is perfect! I wasn't sure what I was going to do with it when I bought it, I just knew I needed it!!

And now here we are on the heels of December! How did that happen?? On November 29th I had a class here in our home that is best described as a party with paper crafting mixed in! I had the gals bring pot luck, and boy there were some yummy dishes. Thank you all!! Ed made a breakfast Strata the night before, and baked it after the people started arriving. While I was getting all the stuff together for our lunch, the gals started making gift tags. I had 20 stations set up about the house, and they would make one tag and move on to the next. There was laughing, stories and creativity flowing all through the house. Some of the tags used retired Stampin Up stamps but most were current products. Many were fairly simple to make. I am only showing the current product ones for this blog hop. Sorry about the lighting, I caught the last bit of the sun before it was done for the day. The first one is probably my personal favorite. 
 A bit of work gluing all the bits in place, but I think everyone loved this one! 
 You know you want to!! Right?!
 Sparkles with rhinestones, but the burlap adds a country touch!
 Do you see the little metal bell charm?? 
 Fun little epoxy star highlighting the banner!
 Simple! But I like the contrast of the red sweater look behind the vibrant green.
 Another simple one, but the holly paper is oh so festive!
 Santa's fur was painted with liquid pearls. He looks dapper, don't you think??
 Simple, but the addition of the punched dots for the holly berries really makes this one work beautifully.
 This one would be so darling atop a plate of your best Christmas cookies!
 This pine cone one was a favorite of many. They all loved the little jingle bell charm!

The tree shimmers with silver sparkle paper behind the cut out. 
 Silver and red...stunning!!
Simple, but sweet with the new Stitched Thinlets!
Thanks for joining me on this blog hop!! 
Now go create!
But, first head over to Mary's blog to see what fun stuff she has done!!
Merry Christmas!
 http://www.doggandponyshow.blogspot.com

Friday, September 30, 2016

September Blog Hop!


Hello dear friends~
I am writing to you on Friday evening, but I will delay the post until midnight tonight. 
Today I spent most of the day waiting around to see doctors or talk to doctors or waiting for prescriptions...it turns out that I brought home shingles as a souvenir from Alaska!! I believe that I am entitled to a partial refund! Ha!! I do have the prescriptions and I am hopeful that it will be over quickly!!

I did spend part of the morning making my card for the Halloween Hop! I must tell you this baby came together SO FAST!! There is nothing to it, really!! The dies do most of the heavy lifting and the only stamping is the verse and the pumpkins! That's IT! Crazy easy!! You, yes you, could make this! 
Here are the details:
Paper: 
Basic Black card stock
Pumpkin Pie card stock
Crushed Curry card stock
A Little Foxy DSP
Ink:
Basic Black
Stamp Sets and Dies:
Spooky Fun Stamp Set
Halloween Scenes Edgelits Dies

I really like this card! The little banner is popped up on dimensionals. 
If you would like to order any of the supplies or anything else from Stampin Up, please let me know! Or you could go to http://elstamper.stampinup.net and place an order on line. It is easy, but if you need help, please let me know. 
Now you can hop to Diana's blog...just click on the button below! I can hardly wait to see what she has done. Please stop by all the folks on the blog...and give them some love.  
Until next time, take good care!
                            ellie :)


Di         http://www.stampingwithdi.com

Ellie     http://www.elstamper.blogspot.com you are here!

Wednesday, August 31, 2016

September Blog Hop!

Hello dear friends~
You may have just hopped here from Mary's blog. Welcome!! Thanks for stopping by!


 The theme for our hop this month is to use items from the new Holiday mini catalog... anything!! Hoo boy howdy, this catalog is so jam packed, that covers a lot of ground. 

At first I thought about a fall card... but I really wanted to play with Christmas. I figured that the other gals might use the Cookie Cutter Christmas stamps and punch so I decided to use the Christmas Pines Stamp Set along with the Pretty Pines die set and the coordinating Pine Bough embossing folder. 

We used to live in the White Mountains of Arizona and believe it or not, that area (the Mogollon Rim) has the largest natural stand of Ponderosa Pine trees in the country! I loved living up there, except during fire season!

My card is the result of my first chance to play with all these goodies! It kind of designed itself! 

 A close up of the pine cone! With a bit of the greenery that you can do with the die set!

 A close up of the detail from the embossing folder- what a crisp impression!

The full front of the card. I just love how it turned out. I had thought about adding some rhinestones or pearls, but I decided to leave well enough alone. The plaid background paper that the card is resting on is from the adorable 6 x 6 paper stack called Warmth and Cheer. Very festive. 
I would LOVE to hear from you ~ tell me what you think of my card!! Thanks for stopping!

Until next time, take good care!
Ellie

Please continue on to Melissa's blog- I can hardly wait to see what she has done!!
 http://www.stampinupwithmelissa.blogspot.com

Supplies used include:
Card Stock:
Whisper White 
Garden Green 
Real Red 
Mint Macaroon 
Soft Suede
Early Espresso

Ink:
Real Red